Easy Paper Plate Bunny Crafts
If you are looking for a fun spring or Easter craft to do with your preschooler or kindergartener, these paper plate bunny crafts are easy to make and don’t require very many materials. You probably already have most of the supplies on hand.
Inexpensive, white paper plates are great for doing children’s crafts. You can use them in many different types of craft projects. Today I will show you how to make two different bunny crafts from paper plates.
For the first craft you will be using a paper plate for the body of the bunny. For the second craft you will be using a paper plate to make a bunny mask. The paper plate will be the bunny’s face. The great thing about these projects is you can use many of the same materials for both projects, which will save you a lot of time even if you don’t do both projects in the same day. For these projects you will need:
Inexpensive white paper plates
White and pink construction paper
Permanent marker
Pencil
Scissors
Elmer’s glue and/or glue stick
White pipe cleaners
Yarn
Stapler
Hole Punch
Cotton Balls
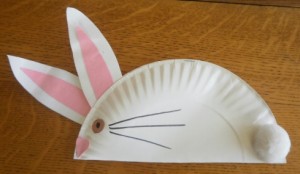 Paper Plate Bunny Craft
On a white piece of construction paper, use a pencil to draw two bunny ears. You will be using the same bunny ears for the bunny mask, so draw as many bunny ears as you will need. On the pink construction paper draw pieces to fit inside of the white bunny ears. Have your child help you cut out all the bunny ear pieces, then together you can glue the pink pieces onto the white pieces.
For the bunny’s body, fold a paper plate in half and staple around the edges. Don’t press the paper plate flat. Leave room to slide the ears in and glue them down (see photo). Glue on a cotton ball for the bunny’s tail.
To make the bunny’s eyes, nose, and whiskers, you can let your child be creative. You can either cut them out from construction paper and glue them on, or you can use a marker to draw them in.
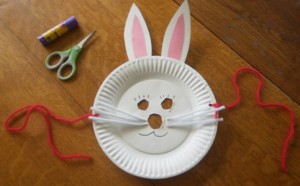 Paper Plate Bunny Mask
This bunny mask is a easy, fun project. My six-year-old twin boys thought it was really dumb until they saw the finished mask. Then they both wanted to wear it.
Hold up a paper plate to your child’s face and with a pencil draw where your child’s eyes and nose should be. You will need to use sharp scissors to cut out the small holes. They won’t be perfect, but that is okay.
For the ears, you can use the same ears as you made for the first bunny craft. For the whiskers, you can either draw them on with a marker or use a white pipe cleaner. I cut one long pipe cleaner into six pieces and glues three to each side of the face. You won’t be able to use a glue stick for this, you will need Elmer’s glue to really get them to stick.
Using a hole punch, punch one hole on each side edge of the plate. Tie a piece of yarn through each hole. These will be the ties for your child to wear the mask.
