DIY Stenciled Wall Panels – Adding Visual Interest To Your Walls
Dear Marc:
I bought an older home and there are slight imperfections on the walls in the bathroom. I’d like to add visual interest on the walls and cover up some of the imperfections. How can I do this without making it look tacky?
Anne
Dear Anne:
When working with unique spaces such as bathrooms, it can be a challenge to add visual interest to walls due to limited space and special placement of traditional fixtures.
Being creative when designing small spaces is important. You don’t have the luxury of large open wall areas to add that certain something that will draw the eye. I love taking traditional ways of applying design and making my own spin on them.
A great way to add visual interest in a bathroom is to look at wall panels. I know what you are thinking, “Oh dear, he’s going to tell me to put up that cheap looking paneling that looks tacky and ugly.” Actually it’s just the opposite. Think of those chic wainscoting panels that people put up at the halfway mark on their walls. They then add a lovely molding to cover the top edge of the panel and a baseboard to cover the bottom edge.
What we will be creating today will be a similar idea. Although, we will be adding a modern twist to this project by mimicking popular wallpaper designs on the panels and working with flat wood panels as opposed to the traditional ribbed wainscoting panels.
You will need the following supplies:
– Wood panels
– Primer
– Deer Feather (CLW 1047W) General Paint (Colour: White)
– Black Russian (CL 3127N) General Paint (Colour: Black)
– Roller and paint tray
– Paint brush
– Large paisley stencil
– Sanding Block
– Painter’s Mate Green tape
Step 1:
Visit your local hardware store and ask them to cut wood panels into 48” (width) by 40” (height) pieces. The panels must be thin in depth as you want to simply add thin wood panels to the wall. During your visit to the hardware store, be sure to pick up the remainder of the supplies listed above and to stop by your local General Paint retailer.
Step 2:
Set up a proper working area. Now that you are ready to start your project, with the use of your sanding block lightly sand the entire surface of the panel. This will help the paint adhere to the panel. Then apply a coat of primer to the panel’s surface.
Step 3:
Once the primer has dried, add 2 coats of Deer Feather (CLW 1047W – Colour: Black) from General Paint. You many also choose to do only one coat and create a really unique look of white with a wood undertone. I call it the beach house chic look.
Step 4:
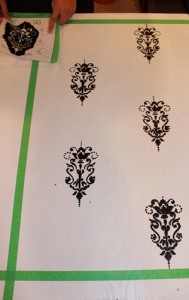
Plan out your design for your panels. What pattern will you follow? Remember less is more. You want to keep the pattern and design simple. Grab your stencil and Painter’s Mate Green tape. Create a grid or straight line with the use of your Painter’s Mate Green tape as to ensure that your design will be straight and accurate. I suggest measuring the width you desire between each stencil. Once you have determined where you would like the first design to be placed on the wood panel, place the stencil in the appropriate area. Tape it down with Painter’s Mate Green tape so that it doesn’t move around as you are painting over it.
Step 5:
Gently apply the Black Russian (CL 3127N – Colour: Black) paint from General Paint to the stencil with the use of a paint brush.
Step 6:
Place the stencil where you would like to apply the next design and repeat step 5.
Step 7:
Keep repeating the same process for the remainder of the panel. Once the panel is complete, repeat the entire process for all the panels you will require for your wall panel project.
Step 8:
Your new designer wall panels are ready to be installed to your walls!
Marc Atiyolil, celebrity designer and home trend expert is the Editor-in-Chief of Home Trends Magazine, and the host of the Marc Atiyolil Show – www.MarcAtiyolil.com.
